As a homesteader I make every effort to make sure that I have a bountiful garden that provides my family with enough food to get us through the year. Now bountiful does not mean that we just plant any old thing, we make sure to curate our garden by choosing the fruits and vegetables that my family and I actually love to eat. And when it comes to growing your own food, make sure to use the ‘one is none rule’. Meaning that you should have enough plants of each fruit or vegetable to make sure that enough survive to harvest time.
One of my favorite times of the year is harvest season, this is when all the hard work and preparation comes to fruition. Hopefully you have enough of a harvest that you have an overabundance of the freshest fruits and vegetables around. The kicker though is that you can only eat so many tomatoes or okra at any one time. Remember when I told you to overcompensate in numbers of plants? So now you should have a great problem in what do you do with all of your extra food? Tomatoes only last so long before they spoil, and what are you going to do during the winter months?
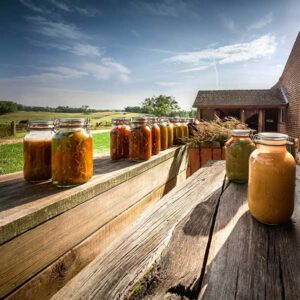
Canning and preserving food at home is a time-honored tradition that allows you to savor the flavors of each season year-round. It’s a skill that not only helps in reducing food waste but also provides you with delicious, homemade treats. Canning is the way to go to make sure you can continue to enjoy the hard work you put into your garden.
Learn the lingo
Canning and preserving are often used interchangeably, but there is a subtle difference. Home canning typically involves the process of preserving foods in cans or jars through heat processing to create a vacuum seal that prevents spoilage. Preserving, on the other hand, is a broader term that encompasses all of the various methods such as canning, freezing, drying, or pickling to extend the shelf life of foods.
Supplies
To embark on this culinary journey, there are a few essential supplies you’ll need:
1. Canning Jars: Glass jars specifically designed for canning, with lids that create an airtight seal.
2. Canning Equipment: Including a water bath canner or pressure canner, jar lifter, canning funnel, and bubble remover.
3. Ingredients: Fresh fruits, vegetables, and sometimes meats, along with sugar, salt, vinegar, and herbs for seasoning.
4. Room to work: A good sanitary work area is a must. Remember canning requires steps with each taking up its own space.
5. Time: Preserving foods takes time and effort and something that cannot be rushed.
What can I can?
When it comes to foods that are ideal for canning and preserving, fruits like berries, peaches, and apples, as well as vegetables such as tomatoes, cucumbers for pickling, and beans, are popular choices. Jams, pickles, sauces, and salsas are common products of home canning. Remember that you can combine items in one jar for a great, essentially prepackaged side dish. My favorites are sweet onions, okra tomatoes, corn and lima beans for my own home made succotash. It makes a great side or even a base to a good hearty soup.
Tell me more
It’s important to remember just like store bought food the shelf life of home-canned and preserved foods can vary depending on the type of food and the canning method used. However, properly canned foods can last from one to five years when stored in a cool, dark place. It’s crucial to check for signs of spoilage, like bulging lids, leaking jars, off smells, or mold, before consuming any preserved food.
Set yourself up for success and make sure to store your home-preserved foods in a cool, dark place such as a pantry or basement, it is essential for maintaining their quality. Avoid exposing them to direct sunlight or extreme temperatures, as these can compromise the food’s safety and taste.
While home canning is a rewarding practice, there are risks involved, such as botulism, a rare, but serious illness caused by a toxin produced by the bacteria Clostridium botulinum. To mitigate this risk, follow tested recipes and proper canning procedures, including using the correct equipment, hygiene, processing times, and acidity levels.
To ensure the safety of your canned goods, always inspect the jars before consuming. Look for signs of spoilage, such as unusual odors, discoloration, or mold growth. If in doubt, it’s best to discard the food. This is why I love to use clear mason jars because instead of guessing you can see what’s going on.
The benefits of home preserving foods are numerous. You have control over the ingredients, allowing you to avoid preservatives and excessive sugars or salts. Home-canned foods also taste fresher and can be personalized to suit your preferences. Additionally, preserving food at home is a sustainable practice that helps reduce food waste and saves money in the long run. One of my favorite tricks is to buy different sized jars. For instance, my succotash might be in one large jar big enough to serve as a side for the whole family. Where I might have some smaller jars of just stewed tomatoes, or jalapeños that might serve as a condiment.
Canning food at home involves a few key steps:
1. Prepare Your Equipment: Gather canning jars, lids, bands, a water bath canner or pressure canner, jar lifter, canning funnel, and other necessary tools.
2. Prepare Your Food: Wash and chop your fruits or vegetables. Follow a tested canning recipe to ensure the correct acid levels and processing times. Make sure if you chop fruits and vegetables try to chop and cut to an even size throughout to keep consistency the same.
3. Fill Your Jars: Use a canning funnel to fill your jars with the prepared food, leaving the recommended headspace as per the recipe.
4. Remove Air Bubbles: Slide a non-metallic utensil along the inside of the jar to remove any trapped air bubbles.
5. Wipe Jar Rims: Clean the jar rims with a damp cloth to ensure a proper seal.
6. Apply Lids and Bands: Place lids on the jars and screw on the bands until fingertip tight.
7. Process Jars: Place the jars in a water bath canner (which can be as simple as large pot of boiling water) or pressure canner according to the recipe’s instructions. Process for the recommended time.
8. Cool and Seal: Allow the jars to cool naturally. You’ll hear a satisfying “pop” as the jars seal. Check for a proper seal by pressing the center of the lid; it should not flex. (Think of store-bought glass jars, with the center pressure point that will pop when the seal is broken)
9. Label and Store: Label your jars with the contents and date. Store in a cool, dark place for optimal shelf life.
Mastering the art of canning and preserving food at home opens up a world of culinary possibilities. With the right supplies, knowledge, and precautions, you can enjoy the fruits of your labor throughout the year while enjoying the flavors of your hard work each season. Home preservation of food can seem like a daunting task, but that is because you may not have been exposed to the process. Remember there was a time before refrigeration and grocery stores on every corner. If the generations before us were able to safely preserve food without the technology we have, then how hard can it really be? The hard part is in relearning the knowledge that was lost from generation to generation. Luckily, your local library or amazon is a great source for some books on the subject that make the process super simple, here are some of my favorites:
1. The Prepper’s Canning & Preserving Bible by Tyler Gordon
2. The All-New Ball Book Of Canning And Preserving by the Ball Home Canning Test Kitchen
3. Pressure Canning & Water Bath Canning for the Modern Homesteader by Elizabeth Ash
4. WaterBath Canning & Preserving Cookbook for Beginners by Lucky Alexander
Remember to always follow tested recipes and canning procedures to ensure the safety and quality of your home-canned foods.
James the “XDMAN” Nicholas Mr. UnPewFessional Himself!
patrick diamond says
I can remember when we had the farm and 3 gardens, we did all the canning of vegetables that the boys didn’t eat I don’t mean that they wouldn’t eat it I just planted a lot so I had enough to can. Carrots were always tough to grow, so when the farmers started the deer carrot sales by the 40# bag full I would buy those. There was nothing wrong with them. they were just not what the canning companies would take. I found a jar of tomatoes from when we lived on the farm a couple of years ago. It was pretty dusty, so I washed it off and everything looked good. It was still sealed and when I opened it, it was like being right there in the garden and the taste was amazing, they were 11 years old. I want to see store brands hold up to that.