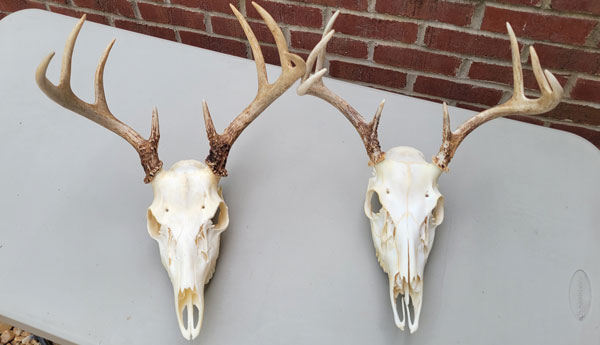
If you’ve made it this far, congratulations! You’re officially at the fun part. And unlike your mean uncle Phil, I do NOT mean that ironically. You’ve suffered through the stink and the steam, the rotted meat and potential maggots. You’ve spooned out eyes and cut off ears, but you’re now at the finish line, and its time to whiten and mount your beauty. Remember that hydrogen peroxide I told you to order, end of June? Break that out, some latex gloves, a cheap stock pot (and if you happened to get a paste-style peroxide, a cheap paintbrush), and lets get moving.
Whitening with Liquid
This process will vary slightly depending on if you’re using liquid or paste hydroxide. If you’re using liquid, set your skull in the pot and submerge it in the 40- or 50-volume hydrogen peroxide (AFTER donning your latex gloves, as this stuff will burn, and turn your skin chalky white). Make sure the level isn’t too high, though! You don’t want to bleach your antler bases. Chances are, this will mean you can’t submerge the whole skull, so just ladle some peroxide on the top of the skull every 5-10 minutes. You can also wrap the bases if you want to be extra careful, but be certain you wrap them in plastic!! Wrapping them in cloth or some other absorbent material could lead to the covering soaking up peroxide, leading to the exact situation you wish to avoid.
Some folks soak their skulls overnight. Personally, I have never seen it need this long. Soak your skull for several hours, checking on it regularly. When it reaches your desired whiteness (some people like a more browned look, others like blistering white), pull it out, wash with water, dry and let it sit. Even once washed, the skull will continue to whiten somewhat for several days, thanks to peroxide that has gotten into the pores, but your wash ensures the majority of peroxide is removed or neutralized.
Whitening with Gel
If you’ve ordered a gel solution, the process is similar. Don your gloves, set the skull in the pot, and pour the gel over the skull, coating it as best you can. Once you have a decent amount in the bottom of the pot, take your brush and paint it on to any of the spots you may have missed. The gel will stick to the skull pretty well, so just walk on by and apply another coat about every half hour, to ensure coverage stays even. Beyond that, the process is the same as above. Let it whiten to your desired shade, wash, dry and let sit. Your skull is officially done!
Bleach
As I am aware that bleach is the first solution many DIYers try, in place of Hydrogen Peroxide, I just wanted to add a quick note explaining my preference. If you do not know the proper times, amount and temperatures with which to use bleach, it can be disastrous for your skull, weakening the connective tissues holding the bones together, and eventually causing the whole thing to piece apart. Truth be told, even the taxidermists I have talked to shy away from it, as it is just such a corrosive substance. The moral of this aside? If you have access to hydrogen peroxide over bleach, I would use it every time. Now then, on to mounting.
Mounting.
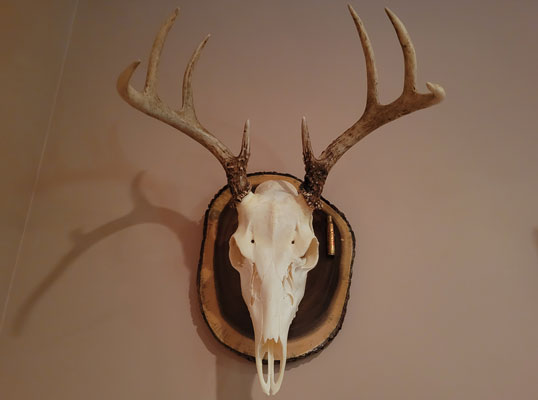
I debated doing a separate article on mounting, discussing some various techniques, but decided that would be dishonest to my process. Fact is, I like fairly simple mounts, such the one seen below. Take a wood of your choice (I am partial to black walnut), and cut a lateral section from the log (or, if you have none on hand, visit your local lumber yard–they should be able to accommodate your request). Leave the bark on, as a live edge save quite a bit of edging work, and gives a very rustic feel. Take an epoxy resin (I am partial to this one, as I usually have some left over from tables, and other such projects: Epoxy Resin Crystal Clear), and paint it on to the back (whichever side you prefer least), while the wood rests on a level surface. Why the back, you ask? Because chances are, on your first go round you will pick a surface that is not quite level, and the epoxy will self-level at an angle. As usual, don’t ask me how I know. Once you have a feel for your materials, epoxy the front. This will both protect and shine the wood, and help keep that live edge fully attached.
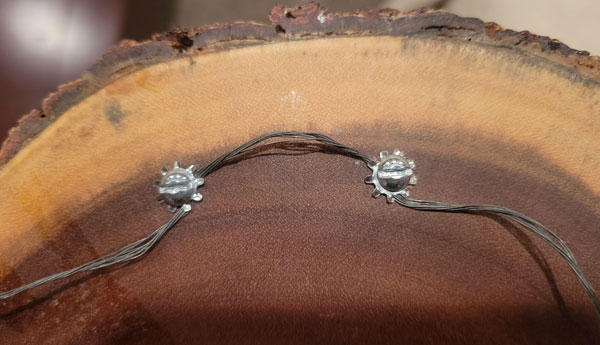
On the back, wrap wire around two screws near the top of the wood in the manner seen above. Too low (and past the midpoint in-particular), and the whole mount will lever out from the wall and attempt to flip over. Using this makeshift picture wire, you’ll be able to catch the nail or hook on the wall.
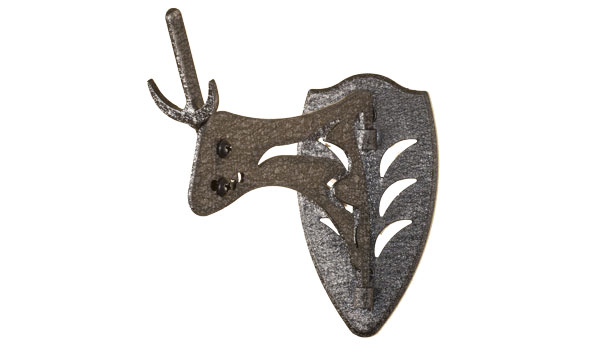
To fasten the skull, there are plenty of options out there on the market, like this handy little unit from Skull Hooker. They are easy to use, look professional, allow you to control the angle of your skull, etc. But me? I’m cheap, and I’ve found these towel hooks from your local hardware store work just as well for my purposes. Even better, they come in black, silver and gold, and will only set you back a couple bucks a piece.
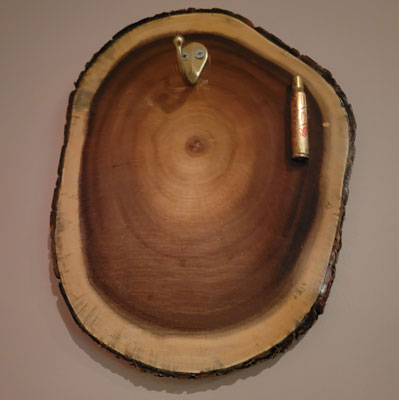
Drill it into the board, maybe glue on the shell you dropped the old boy with, insert the hook into the brain cavity and viola! Your mount is complete. And with that, I need to go check my feed plots, as I officially cannot wait till fall!
A humble homesteader based in an undisclosed location, Lars Drecker splits his time between tending his little slice of self-sustaining heaven, and bothering his neighbors to do his work for him. This is mainly the fault of a debilitating predilection for fishing, hunting, camping and all other things outdoors. When not engaged in any of the above activities, you can normally find him broken down on the side of the road, in some piece of junk he just “fixed-up.”
